

Mastering the Lost Zone in Pokémon

If you have started playing Pokémon TCG recently, it is very possible that you have faced a Lost Zone deck, a type of strategy that focuses on sending as many cards to the Lost Zone as possible in order to activate several cards that completely change the state of the game. But finding the ideal 60 cards is not easy, as there are many options and available routes. In this article, we are going to look at the skeleton of Lost Zone decks and present a couple of possibilities so that you can make informed decisions and pick the one that adjusts better to your own playstyle. Let 's go!
Understanding the Lost Zone engine | Pokémon
In case there are any doubts, the Lost Zone is a place in the Pokémon TCG battlefield where, once a card goes there, there is no further interaction or possible recovery. What goes into the Lost Zone, stays in the Lost Zone until the game is over and another one begins. Having said that, you might be asking: why would you like to send cards there if there is no apparent advantage? Because in the last Pokémon TCG expansion, Lost Origin, we received a bunch of new cards that become more powerful depending on the amount of cards you are able to send to the Lost Zone.
The hearth of everything is our little psychic friend called Comfey (side note: if you haven’t already picked them, do it as soon as possible because they are quickly becoming more and more expensive!), that allows us to check the first 2 cards of our deck, keep one and send the other to the Lost Zone. Then, we have the supporter Colress’ Experiment, which has a very similar effect but with 3 and 2 cards respectively. These two are the main activators of any Lost Zone deck and the core of every version so you will need to run 4 copies of each. Your goal, therefore, is to play a couple of Comfey in the first turns coupled with Colress and… that is where the fun begins!

After you’ve successfully managed to send cards to the Lost Zone, you can benefit from very powerful cards. You need to remember the following numbers: 7 and 10. They are the milestones you are looking to achieve during the game. Mirage Gate is an amazing accelerator of energies that becomes available once you have 7 cards in the Lost Zone and the item you will use to power up very effective attackers out of the blue. Since Mirage Gate has no restrictions -other than its activation costs- you can combine it with practically everything so what Pokémon you use depends on your personal taste and strategy.
After that, once you’ve reached your 10 cards in the discard pile, you are almost getting at a game-ending stage because you can use the powerful VSTAR move from Giratina VSTAR, deleting one Pokémon from existence, or chose to use Sableye and open an onslaught of damage counters turn after turn.
Giratina VSTAR Lost Zone Deck
Having seen the base of the deck, it is now time to see some of the variants that you can choose from. What you have below is a standard list that revolves around Giratina VSTAR.
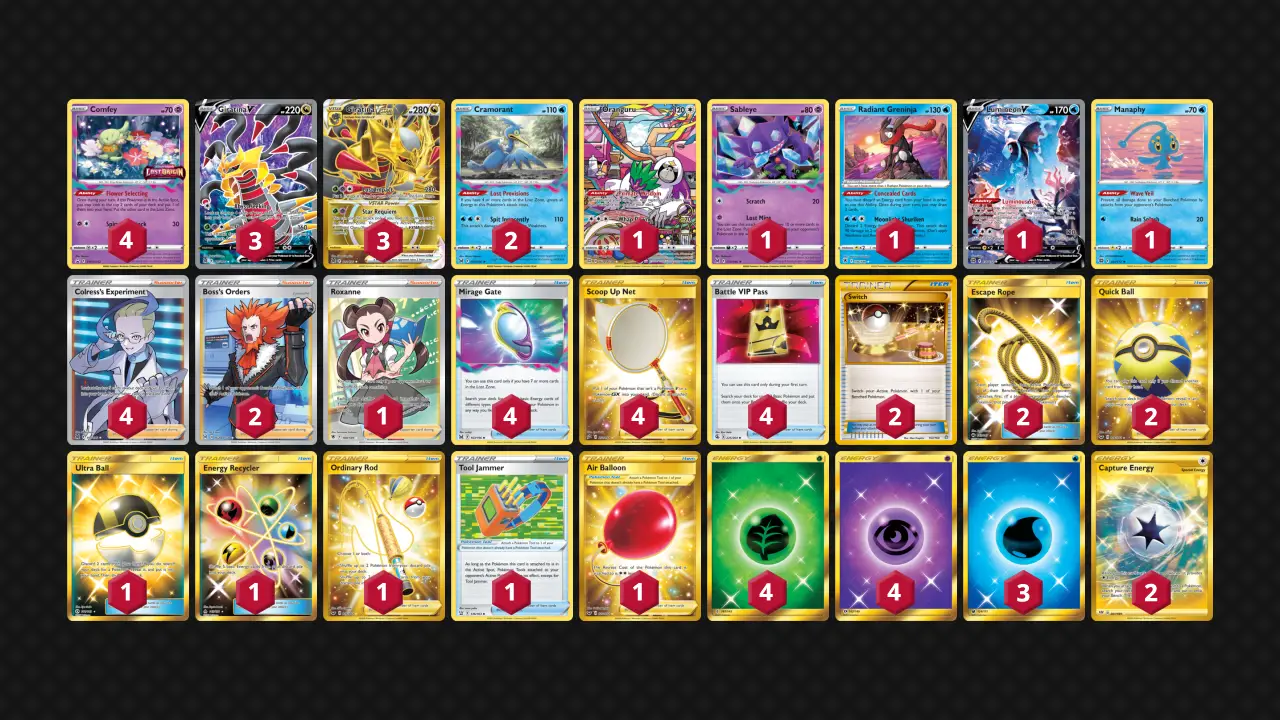
The main objective is to quickly send cards to the Lost Zone in order to activate Mirage Gate (and this can be done in turn 2) and power of Giratina VSTAR. Giratina is, in fact, a very scary attacker who can effectively deal with other VSTAR cards in the format, so your opponent is pressured as soon as it hits the field. In case that you need to vary your plans slightly, the deck also runs other interesting attackers like Cramorant, Greninja or Sableye.


 - Black")
 - Radiant Plum")

 - Petrol")
Lost Zone Toolbox Deck
This version of the deck stays away from VSTAR Pokémon and focuses solely on one-prize attachers, which can be beneficial in the sense that it forces your opponent to take 6 of them down in order to win the game. The only “downside” is that you are not taking advantage of the raw power of Giratina VSTAR so you need to put emphasis on other attackers. As you can see, the main ace card is going to be Radiant Charizard, who can deal consistently 250 damage every turn. Another interesting aspect about this deck is that, since you only rely on low HP Pokémon, you need to recycle them turn after turn so Klara is the perfect choice here.

Lost Zone Cramorant Deck
This last version is the least competitive but probably the most funny of the ones we are analyzing here. The most interesting aspect of this approach is that you basically run no energies because you rely on Cramorant’s ability to attack when having cards in your Lost Zone. The only problem here is that the damage output is not great overall and that you immediately lose against something that runs Empoleon V or has a way to shut down your abilities.

Conclusion
No matter the version you chose, it is clear that Lost Zone is a very powerful deck that can for sure have an impact on the metagame. In fact, after a few weeks of the release of the new set, Lost Zone has climbed up in the rankings and become one of the most popular archetypes. Try it out and see the power of the Lost Zone yourself!